Following the discussion from my prior post, you might be wondering how to get those tenons to fit nice and tight - and do that consistently. It's not magic, but there is a method and tools that make it seem like it.
Here are the tools I use. The first is a beading tool that Henry Taylor makes. Its 3/8" across. On this beading tool goes a Sorby sizing tool. With proper use it will give you repeatable turned diameters without using a separate caliper.
The other tool is a dial caliper, and it is a real must in my book. You'll want to measure the tenon as you test it and adjust your beading/sizing tool to tweak the fit until everything is just right. It can be just a few thousandths that make a difference in a perfect fit so this tool will save you lots of time.
Using these tools allows me to adjust my fit for each kind of wood I use. Also, since different styles of drill bits leave a slightly different size hole, despite being the same diameter, this will allow me to adjust my fit for each unique set up and drilling bit I use.
Hope this gives you a little extra help in the shop for that next project!
By the way, these tools can be found at Lee Valley.
An important part of chairmaking is knowing how tight to make a joint in order to get a proper fit. How tight I make a joint will depend somewhat on the type of wood used but, essentially, I want it as tight as possible without splitting the joint - and having to use a little force to bring it together is not necessarily a bad thing.
A good rule of thumb for testing a windsor chairmaking mortise and tenon joint is if you can put the joint about half way together with only hand pressure then you are about perfect. Then during assembly you can force it togther with a few hammer blows.
In windsor chairmaking, you are not often putting multiple joints together at once so a tight fit like this is possible without complicating a smooth assembly. On the other hand, with a post and rung assembly, I will back it off just a hair so I can have a bit more control on an assembly. When you add up a lot of joints that have to come together at the same time on one of these chairs then the extra give can be the difference between success and a struggle or failure.
Here is a short (and very out of focus) video of how tight I try to make the joints for a post and rung chair joint.
Welcome back to the low budget video series all about wooden planemaking. You know the drill. I work in the shop and at random pull out my camera and shoot a short segment of what I am doing at that moment. Then you try and decipher what I showed and how to apply it. Your welcome.
Maybe someday I will get a proper camera and set aside two weeks to make and edit a complete series on how to make an entire plane like a rabbet or panel raiser or whatever. But until I do a Kickstarter or someone drops a paycheck in my lap for those two weeks this is probably about the best I can muster at the moment. I really do hope they are of some value. Anyhow, on to the handle instillation.
When making the mortise for the handle this is one of those places that I count on machine work to make a precision slot. I use my slot mortiser to make the slot and then I square up the corners with a corner chisel. I do this so that the joint makes the best glue up as possible.
Also, I don't want just the sides of the handle to adhere to the mortise but the bottom of the handle should make contact in the mortise as well. Usually in a typical furniture joint this would be end grain and wouldn't need to be glued but in this case we can take full advantage of the long grain surfaces coming together. This adds nearly a third more glueing surface to the joint.
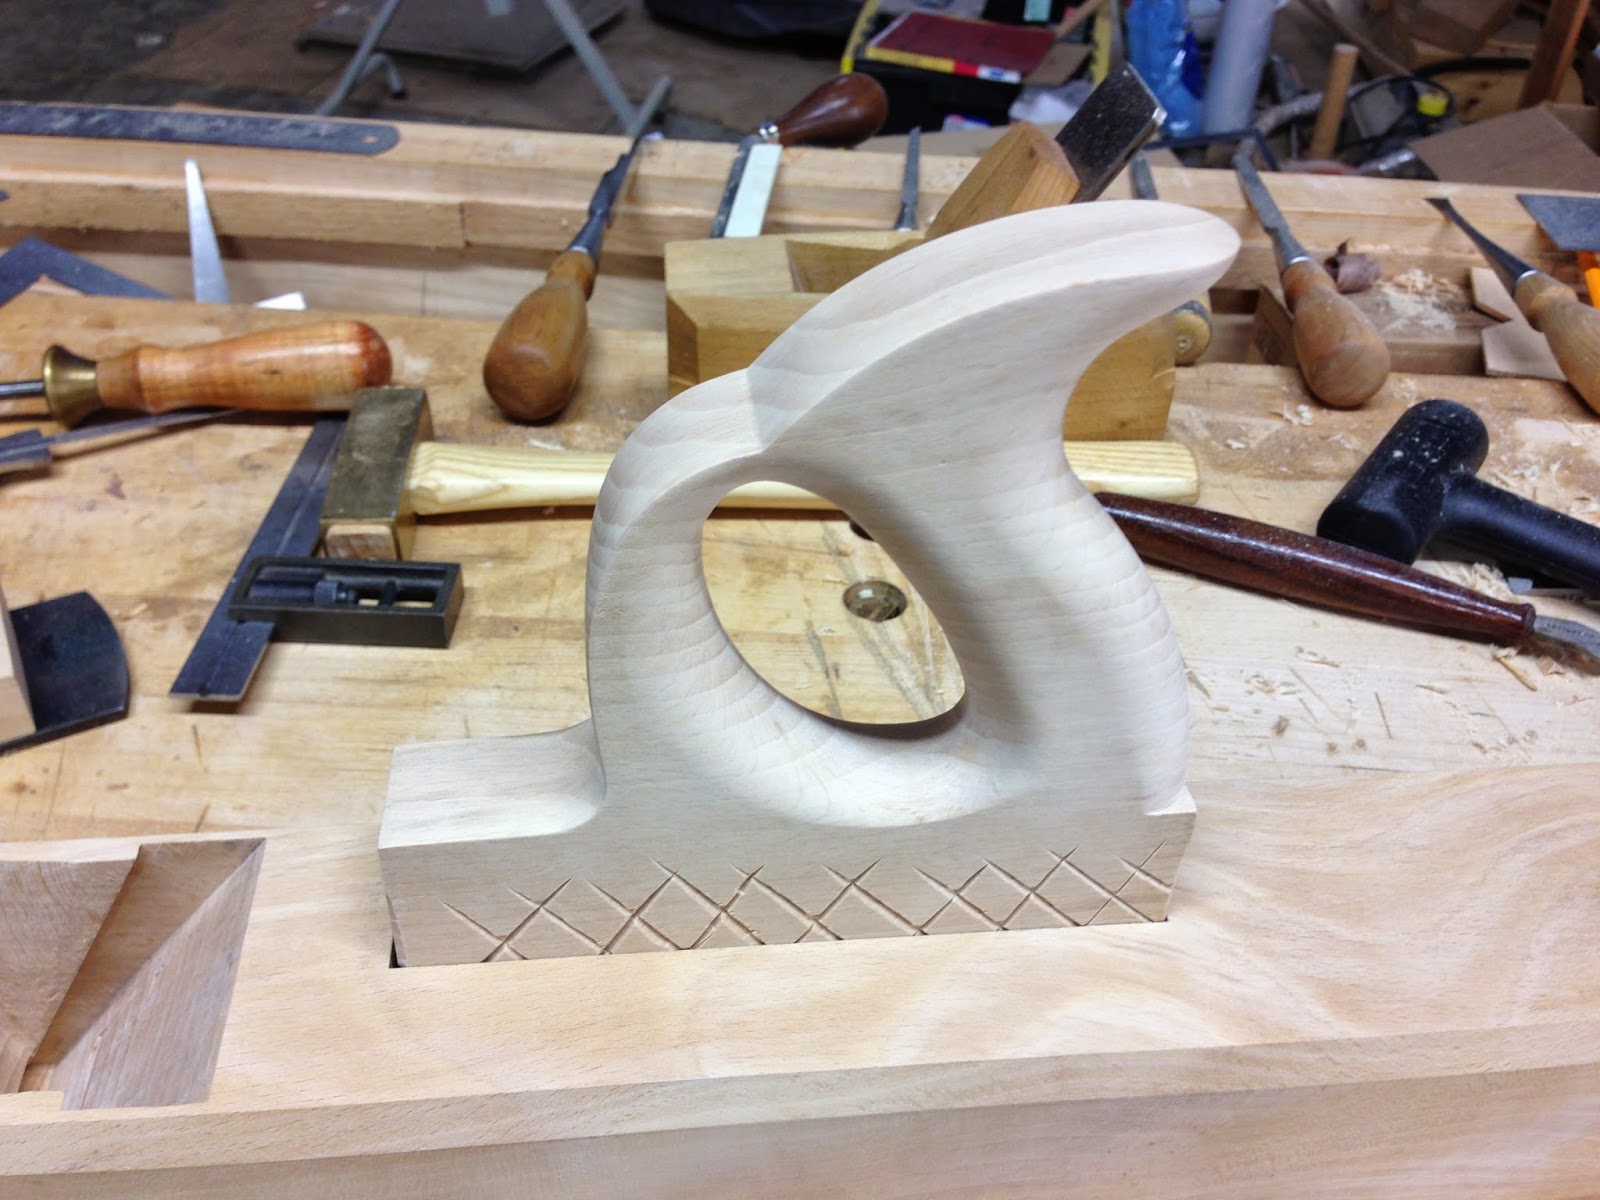
When fitting the handle make the mortise first. Then with the handle left slightly oversized you can plane it down to make a perfect fit to the joint. I make some criss cross cuts about two thirds of the way up around the bottom of the handle to let the surfaces stay tight but slip together. This also lets any heavy build up of glue have a place to escape to rather than resisting instillation of a really tight joint.
The gap at the front of the handle is filled with a wedge. I actually undercut the back of the mortise ever so slightly and match the back of the handle with the same angle. Therefore once the front of the handle is wedged in place it locks the handle in place. It is a little thing but I figure why not.
One of the things I have seen "messed up" on a number of planes is the instillation of the handle. Often times it is a lot to do with the orientation of the wood. It might seem wrong at first but note that the handle wood is oriented in exactly the same way as the body of the plane. Quarter sawn and grain running front to back not up and down. If you glue in a handle with the grain up and down, the cross grain orientation of the two pieces with break the glue line within a few moisture cycles for sure.
Other than the wood orientation you need a good tight fit between the glue surfaces. That is what I show in the video and you really must use hide glue. Liquid hide glue is fine. I prefer the Old Brown glue brand but will use the Titebond brand as well. The Old Brown brand is nice and stinky like the glue pot version. I actually love the smell but then again I am sort of weird like that. You'll still need to heat the liquid version though. I would have shown the glue up but I didn't have anyone to hold the camera.
Again, don't use the yellow glue (PVA). When the joints are really tight the glue grabs when you are putting the joints together and it is a real pain. I only use the stuff for edge gluing joints. This is just the chairmaker in me coming out. Us guys never use the PVA stuff unless we feel like crying. Use what you want, you've been warned.
I stumbled upon this video not too long ago. I really enjoyed it and decided that you folks might like it too.
The video shows a window frame being made with all the basic steps in just a few minutes of video. It makes me want to make some windows especially after picking up the book on Doormaking and Window-making that LAP recently put out. Fascinating to see the difference between factory made vs. craftsman made.
I would like to find one of those coping planes that is used in this video. Would be a good one to study.
I should mention that the video is curtesy of the Arnold Zlotoff Tool Museum. The joiner in the video is Ted Ingraham.I would like to make it up to the place someday. Would be quite interesting I am sure.
My pudding is pistachio, what's yours? That makes no sense but that is what just came to me when I looked at my photos.
What am I talking about? Well an interesting little thing that I came upon when wedging through tenons has proven to be true and not just theoretical. I think it was about a year or two ago that Pete Galbert was talking about glueing only one side of a wedge when putting them in. I hadn't given it much thought as being anything ground breaking but once he started talking about it I realized that this was in fact what I had been doing and was significant to the longevity of chair joinery.
Why glue only one side of a wedge. I started doing it as I recall because I had heard about someone actually splitting the end of a tenon before assembling it with the mortise. I don't remember who it was. But the idea was that the tenon would have a weak area in it so that when the seasons changed the moisture content of the wood, thus expansion/contraction would happen, the stresses would simply spread the split in the tenon rather than break the glue joint.
So basically I figured that if you only glued one side of a wedge then the other side would serve as the weak part of the joint and spread rather than stress and break the glue joint. So here is the proof that it actually works. My house has been really dry. All my wood flooring has gaps between the boards and the humidity has been down around 10-20%. After coming from humid south east Texas this is all new to me.
Look at what the joints on my settee have done. One is the leg tenon coming through the seat. The other is the tenon coming through the handhold. One side of the wedge has opened up rather than there being a failed glue joint.
Very interesting, is it not.
By the way, I have been doing a lot of reading and editing of Pete's book that is due out this year. This post didn't start out as a way to plug Pete's book but I have to say that if this sort of stuff interests you then trust me you will love this book. It is packed with, among other things, little nuggets like this.
I got a little nudge to follow up on something I promised to talk more about which is how to do those joints in Danish furniture where the rails meet at the same height on a post of a chair leg.
From the first time I made these chair joints until now I have made them the same each time in designs that require this type of joint. I have not had one fail yet. Honestly I had wondered for a long time just how the factory made there joinery. Turns out it is the same. I discovered some photos of an antique one that was for sale and the joint had come apart and there was my answer. I don't think it takes a real genius to figure this out but it is nice to have confirmation when you see a factory example of it to confirm you aren't making substandard joinery.
So I will let the pictures speak for themselves especially since I am heading out of town for the weekend and my time is a bit crunched.
By the way I do cut the mortise on the slot mortiser. You could use a router as a substitute but couldn't make any recommendations on how to use one of those things.
Here is an example of an assembled joint from a Møller style bench. You can see the typical thicker portion of the post at the joint height. This helps add more meat to the joint and a shoulder surface for support of racking forces.
Below is how the joint intersects in the middle of the post. The mortises make an X if you viewed a cross section of the post. I place the rail that is shown vertically as the front to back rail and the horizontal as the left to right rail. This way the front and back rails "pin" the side rails in the mortise. I think of it as a sort of back up if the glue joints weaken. There is plenty of glue surface in these joints as well. Surprisingly strong.
Some additional views below.
Above is the joint before shaping. I carve off the corners and then finely rasp the surface to match the shape and thickness of a piece of cord.
I have found no faster way to round down the tenons to match a slotted mortise than a no.6 grain rasp. On that note I prefer round as opposed to square mortises here because I think the joint is less likely to split out when stresses are applied to the joint.
For reference the tenon is 3/8" thick by 1-7/8" high (I think?) and the post are 1-1/2" square at the joint.
I know that when you look at a Danish modern chair there are a few kinds of joints that we are not familiar with in our western chair making. The rectilinear cylindrical shaped cross rails as well as multiple rails entering at the same height 90˚ to each other on a relatively small post. I think the only perspective most of us have is what Sam Maloof did with some of his chairs when joining the arm rest to the front leg post. Though that is not the joint I will be discussing now. I think it is no coincidence, by the way, that his chairs reflect the Danish design movements considering he made his chairs during the period of the mass production of Wegner and in particular Møller chairs.
Since I mentioned Sam Maloof then I think something I recently read about him in the Los Angeles Times said with regard to his thinking about sharing his knowledge that I can completely agree with and reflects my thinking as to what motivates my blogging. It is a paraphrase of something he said- "'He didn't believe in keeping trade secrets and was eager to share knowledge earned through trial and error to save what he called "a struggling craftsman" hours of frustration.'" Hopefully this post saves you some time.
So here is how I cut the joints for a rectilinear cylindrical cross rails ( Not sure if that is the right way to describe that shape?). I think a video is appropriate to show this. This blog post is a long time in coming as I did this video about two years ago and it just sat on my computer until now. This is a leg for my Elbow inspired chair but is the same for any other chair of this type. Notice how I use my angle gage to orient my leg to the angle that I want to mortise my rail in relation to my rung mortise.
This is not how the joint is made in the factory. I didn't know this when I started making Wegner chairs. The factory chair have a specialty shaped shaper that cuts a tenon that is narrower than the rail and it leaves a shoulder that conforms to the shape of the leg. It is great because it leaves more material for the post and it also simplifies assembly. The method I use lets me be more flexable in my design because I can change the designs without worrying about getting a new custom shaped cutter head. If I were doing mass production then that would be a different story. The drawback in my method requires that a joint without a shoulder be cut exactly dead on otherwise there will be a gap in the joint. The assembly is also a bit more tedious. Maybe I will change someday but it is how I like to work for now. Here is a video that I found on You Tube that shows some of the joinery being made at the factory producing some Wegner chairs. It gives some great insights to their processes and the "shop made" type jigs they use. It is pretty cool. There is some unique tooling I have never seen before. Click here to go straight to the joinery part of the video discussed or I encourage you to watch the whole video below.
The joint for the weaving rungs are cut in a similar way in the factory produced Wegner pieces. This makes the angle of the rung set exactly during assembly. However, I simply use a round mortise and tenon and set the angle during assembly. I will follow with a discussion on how to make the joints for rails that meet at the same height on a post 90˚ to one another. Enjoy!
So I am gearing up to be at the Woodworking In America Show in a couple of weeks. It has been a funny back and forth game. Am I going, am I not? I rented a booth about six months ago and then canceled it when I realized with all the work I had on my plate there was no way I would have time to prepare what I wanted to present, which was planes.
Well wouldn't you know it, Peter Galbert calls me and has space in his double booth for me if I want to use it. OK, I say, I will go if you twist my arm. If he only knew I was secretly planning on showing up, be a party crasher, and hang out in his booth uninvited. I knew he would be too embarrassed to tell me to go home. OK, maybe that is not true, but I obviously have wanted to go this year and looks like I will.
So I won't have all the planes ready that I want to show off. In fact, I will probably only have two sets of planes for sale since I am so ill prepared but if you have wanted to try out some traditional 18th century style planes then here is your chance. I will have some moulding planes (hollows, rounds, custom profiles) and bench planes on hand.
With that said I wanted to show off a plane for making raised door panels. It features a skewed blade for making really smooth cross grain cuts without splintering. I was inspired to make this plane after seeing it in use on The Woodwright's Shop with Roy Underhill episode 3209 of the 2012-13 season. Go to the 21:30 minute mark and you will see his in use. I think he says this is circa 1830 plane that he is using.
On the fly, I threw together two videos of the plane making the long grain and the cross grain cuts. I didn't plan this video so, as you can see, I didn't make the cross grain cuts first as you actually do in making a real door panel but this gives you an idea of how it looks in action. I am cutting this in walnut so you can imagine how nice this will cut everything else. Hope you like them!
I am always pleased to hear when someone receives a piece of furniture from me and they are amazed at how well built it is. (Sorry, I know it sounds like I am patting myself on the back but, please read on). However what this tells me is that most people have never really seen properly built furniture. This is not really our fault. Most of us have experienced furniture the Ikea way, screws for joints and particle board for the structure. It reminds me of how there was a time when the average person could buy a used vehicle, look it over, and actually know what to look for to see if it where in good shape. There has alway seemed to be a lose of knowledge as society "advances".
So let me get to the point of this entry. I just recently had a customers who had previously bought a table from a "craftsman" and it was cracking down the center of the table very badly. I was unfortunately unable to give her a simple fix. It was constructed inproperly from the beginning. Let me show one way you should expect a solid wood table top to look from the under side when it is properly constructed. This photo is the bottom of a typical table top I build in my shop.
Notice the little blocks attached to the bottom of the top that are then slotted into the rails. Notice that the rails create a frame work. Why go to all this effort, can't I just screw the top to the base and legs? Its true, I could, and some have tried (as in the case of the "craftsman" I perviously spoke of).
Now here is why you shouldn't... First you need to understand that wood moves with moisture change from summer to winter. It moves a lot, as much a 1/8" per foot, depending on wood type. Thats 3/8" for a three foot wide table. Now look closely and you can see that the slot that the block is slotted into is oversized. This allows the top to "float"on the framework under the table top while staying in place and flat. If you where to screw the top on in a fixed position (which might seem the obvious thing to do) then the top will start to split down the length of the table as it expands and contract through out the year. I know, scary.
So bottom line. Buy well made furniture from a craftsman that not only has the tools to "work wood" but also understands wood and how to properly build with it. Century's of tried and true construction methods can't be ignored when using this ancient building material.