Showing posts with label Hans Wegner. Show all posts

Monday, January 19, 2015

Glue Up Of A Post And Rung Chair / Stool Assembly


I wanted to give a little sample of a glue up of a post and rung assembly. This is not the entire process but my hope is to share some little details about applying the glue and how to clean it up as you go along. These things are not often discussed in books but it is helpful to see how it is done so that your process goes cleanly and smoothly.


I use hot hide glue exclusively in chairmaking. Using PVA glues, or just about anything else, is simply madness if you plan to have well fitted joints. PVA glues will bind up in a split second in a really tight joint and will stop it from going together completely. On the other hand, hide glue will actually lubricate a joint making tight fitting ones come together more easily


You'll notice the first tool of the trade here is a good stiff bristle brush for wiping away the excess glue. This is just a cheap natural hair brush from a hardware store with the bristles cut way back near the base. Removing the majority of the glue this way keeps you from smearing it around and then worrying about getting it all wiped off. Also, try to avoid adding any water to the surface as you clean so that you do not dilute the glue and spread it around even more. That said, slightly damp cleaning tools may help lift the glue better.

Your next tool is going to be paper towel for cleaning the joints. This may prick your eco-friendly conscience but a clean surface each time to remove the glue is, in my opinion, the only way to go. Using a wet rag will only spread it around for you to fuss with later before finishing. Plus, a paper towel will pick up the glue off the surface better than a rag.

Lastly, be sure to use something like an old magazine under your work so that you don't damage the side that is on your workbench.

I first learned most of these methods from Peter Galbert. If you have heard about his upcoming book from Lost Arts Press and are wondering what to expect, this is the sort of detail that he covers. It seems nothing is left to guesswork. 

Even though I read and helped edit most of the text early on I can't wait to get my hands on the finished copy. Chris and Megan did a really great job of compiling the book into a super easy to read style that is a hallmark of LAP publications. Plus, Pete went back and reworked a lot of the drawings and I haven't seen all of those yet. Very eager.  Come on Chris, get that thing to the printers!!!!!

Wednesday, October 30, 2013

Danish Modern Chair Joinery - Using the Slot Mortiser

I know that when you look at a Danish modern chair there are a few kinds of joints that we are not familiar with in our western chair making. The rectilinear cylindrical shaped cross rails as well as multiple rails entering at the same height 90˚ to each other on a relatively small post. I think the only perspective most of us have is what Sam Maloof did with some of his chairs when joining the arm rest to the front leg post. Though that is not the joint I will be discussing now. I think it is no coincidence, by the way, that his chairs reflect the Danish design movements considering he made his chairs during the period of the mass production of Wegner and in particular Møller chairs. 

Since I mentioned Sam Maloof then I think something I recently read about him in the Los Angeles Times said with regard to his thinking about sharing his knowledge that I can completely agree with and reflects my thinking as to what motivates my blogging. It is a paraphrase of something he said- "'He didn't believe in keeping trade secrets and was eager to share knowledge earned through trial and error to save what he called "a struggling craftsman" hours of frustration.'" Hopefully this post saves you some time.


So here is how I cut the joints for a rectilinear cylindrical cross rails ( Not sure if that is the right way to describe that shape?).  I think a video is appropriate to show this. This blog post is a long time in coming as I did this video about two years ago and it just sat on my computer until now. This is a leg for my Elbow inspired chair but is the same for any other chair of this type. Notice how I use my angle gage to orient my leg to the angle that I want to mortise my rail in relation to my rung mortise.


This is not how the joint is made in the factory. I didn't know this when I started making Wegner chairs. The factory chair have a specialty shaped shaper that cuts a tenon that is narrower than the rail and it leaves a shoulder that conforms to the shape of the leg. It is great because it leaves more material for the post and it also simplifies assembly. The method I use lets me be more flexable in my design because I can change the designs without worrying about getting a new custom shaped cutter head. If I were doing mass production then that would be a different story. The drawback in my method requires that a joint without a shoulder be cut exactly dead on otherwise there will be a gap in the joint. The assembly is also a bit more tedious. Maybe I will change someday but it is how I like to work for now.


Here is a video that I found on You Tube that shows some of the joinery being made at the factory producing some Wegner chairs. It gives some great insights to their processes and the "shop made" type jigs they use. It is pretty cool. There is some unique tooling I have never seen before. Click here to go straight to the joinery part of the video discussed or I encourage you to watch the whole video below.


The joint for the weaving rungs are cut in a similar way in the factory produced Wegner pieces. This makes the angle of the rung set exactly during assembly. However, I simply use a round mortise and tenon and set the angle during assembly.


I will follow with a discussion on how to make the joints for rails that meet at the same height on a post 90˚ to one another.


Enjoy!


Saturday, September 28, 2013

Weaving Hans Wegner's CH25 - Photo Series

So here it is. I know that this is an often searched for and requested topic when it comes to weaving Danish furniture. I have seen the forum topics myself from several years back while trying to acquire the details on the subject. As with many of these things I decided maybe I just need to be the one to figure it out and share it.


So, here are a lot of photos showing the basic bones of the process. This is not a "how to" or a "step by step" but it will get you the basis if you examine the what and where and what order I am on, etc. I would like to give a more thorough explanation but due to time this will have to be it for now. Hope it helps some.

Oh and thanks to my wife for coming down and shooting some photos, otherwise I wouldn't have the seat weaving part. I shot the back portion, thus no me in the pictures.


Weave the front and rear rails as you would a Danish cord pattern of this sort. I hate saying that because there is no proper instruction on how to do this correctly out there. There is a way to wrap the rails while working from the roll rather than taking a bundle and going around and around the rail but I have never seen anyone explain it. I will at some point but for now wrap the front and rear rails and string the cord from front to back as you know how. Then work the weave left to right.


Work the cord over and under and pull through. By the way I have seen instruction that say the initial front to back weave is to be left loose. WRONG. It must be pulled tight. Not tight like a guitar string but definitely not intentionally left loose. The left to right weave is left just loose enough to make a nice up and down wave pattern through the initial front to back cord. If the left to right pattern it is pulled too tightly then it will not pack in neatly.


The return weave is wrapped around a steel bar that runs from front to back. Notice the steel wire that goes between the bars to keep them from bowing and keeps the tension balanced across the seat weave. This is critical that you don't use cord nails here instead. They will cause the outer rails to twist and eventually, very likely, split out somewhere or at least compromise the structural integrity.


Another bottom view for clarity.


There are slots in the rails for cord to go around where joinery would interfere with the cord. This is a block glued on to create space for the cord to go around the arm joint. Notice the cord areas are recessed so that the cord ends up just proud of the surrounding wood surfaces.


Start by weaving the vertical portion. This is the part that is a secrete and I can't reveal. Just kidding! The bottom rail of the back is wrapped first while leaving spaces for the vertical cord to fall in when the top is being wrapped. The top rail is then wrapped with a single cord and then drops down to form the vertical lengths at the appropriate spacing. The hole in the top of the rail allows you to form a wide band of cord on the back of the seat while maintaining the pattern on the front. Why you ask? Ok, lots of speculation on this but the answer is simple. You need a place to hide your knots when doing the left to right weave.


Here are some photos of everything all done up. 


Now all you need to do is install the arms and legs without getting glue on any of that cord. Yikes! Don't fret just use some blue painters tape around that area. Oh and make sure and do the finish before the weave, of course.


Now I have on the chopping block a set of four "Round" chairs (aka "The Chair") to do. Can't wait to get to them!


Wednesday, September 25, 2013

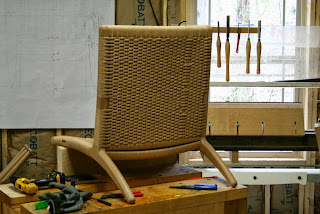
Making the CH25 - Designed by Hans Wegner


Sometimes I feel like I am resurrecting the dead or at least recreating Jurassic Park. The paleontology of furniture. Digging up bones (pictures). Sifting through the dirt and debris (more photos- hopefully closeups or bottoms side shots).


When you are hoping to make a piece that you have never seen and not too many people have either and to top it off any technical information on them is no doubt buried in some website only in Danish is challenging, to say the least. I fortunately have gained the knack for obtaining at least one or two dimensions and working from pictures after that to the final dimensions of the entire piece with success.


Critical in making this project come together was determining the exact diameter of Danish cord. If you saw my ruler for weaving danish cord post then you know why this was so problematic. Once I figured this part out I had to find photos that showed exactly the number of cords on each portion of the chair. This took me about a year looking at photos that would pop up online. Thanks to an online auction, I stumbled upon some good close ups where I could count each cord. Put that info together with the dimensions and that finally completed the missing details I had been looking for.


Fortunately, Wegner was a craftsman, so his designs follow a logic that a woodworker can see at its core. You can see an underlying structure that is logical in the wood choice. How he utilized standardized lumber dimensions to derive the different parts for proportion and joinery. It is amazing the efficiency of the lay out of parts for production. I have learned after making several of his designs that there is practically no room for improvement. That is why you see so many "modern" chair designs that have his chairs at the core. Though, in truth, Wegner took many of his designs from chairs of antiquity. How about his wish bone chair that is essentially derived from a Quan Yi ceremonial chair (Chinese). I digress...


I know everyone wants to know. How to weave that back? What is that hole in the top of the rail for? Do you use cord nails in the back? No. I can answer that for you. The rest will have to wait for another post. And, YES, this chair is really "that" comfortable. Oh and finally, NO, you have absolutely no need for an ottoman.

Thursday, November 29, 2012

How to Weave A Danish Paper Cord Seat - Series

So I have been wanting to post a series on how to weave a Hans Wegner style Danish paper cord seat for a few years. I finally have gotten around to it. I just finished up a set of 6 chairs that are the CH36/37 in mahogany and they really are the perfect chair to demonstrate with.


Here are the videos starting with part 1 through to part 6 totaling about 38 minutes. I tried to edit out all the none essentials but I left comments on parts that will not only get you through the weave but some very helpful pointers that I could have used when I began. I suggest watching it completely through before starting. Once you have completed a chair, if you watch it again, you will likely understand and appreciate the additional comments better.

Please leave your comments. If I have left anything out or something seems to not make sense, please let me know. I spent a bit of time editing these so I would like them to be useful.

By the way, if you click on the "Danish paper cord" tag to the right of this page then you will see some posts on the basic weaving kit that I use. I don't cover this in the video to keep it concise.

Enjoy!


Tuesday, October 18, 2011

Steam Bending

I have wanted to give an idea of what steam bending is all about. However, I have yet to get someone to hold the camera to do some videos while I do the speedy process so here is a video that shows the basic idea really well.  I stumbled across this video on how the Peacock Chair by Hans Wegner is made. Move the video up to about the 4:10 mark to get right to the steam bending process or just watch form the beginning.

Enjoi!