I started getting plenty of emails a few days ago when Dropbox disabled all my links along with probably thousands of other Dropbox users. It appears they had a security issue.
Anyhow it took them several days to make it possible to reactivate the links. If you have been searching for the wooden plane plans I offer then here they are back up and running. The dropbox download pages look different but the plans are there.
3/4" Rabbit Plane
7/8" Ogee Moulding Plane
15" Fore/Jack Plane
1/2" Side Round Plane Pair
Coffin Shaped Smoother
Enjoy!

Showing posts with label Plans. Show all posts
Showing posts with label Plans. Show all posts
Friday, May 9, 2014


Tuesday, February 4, 2014
Continuous Arm Chair Plans - UPDATE


Curtis is working on a new website that will make it easier to make a purchase. I can't wait for the videos to start rolling out as well. They will be posted up on Youtube. This time he wanted to have the plans ready as he rolled out the videos so that you could build along if you wanted. Should be great.
There are some extra videos on some really important subjects that will be following as well. You will like them if you have ever needed help choosing a good log. He has tons of experience.
I'll update everyone when they go up on his site and the videos are up on Youtube. It should only be a few weeks from now!
 |
| 1:2 Scale Front & Side View |


Wednesday, November 27, 2013
Free Cyma Recta / Ogee Profile Moulding Plane Plans
Here is some plans I have had setting on the shelf and I finally got around to cleaning them up well enough to throw out here on the blog. Hope you like them.
This is a complex profile moulding plane featuring a 7/8" ogee profile just like I showed off in a prior post. It is a side escapement plane and is a very functional size. A 5/8" size is quite useful as well for general work. This should give you an idea of how to produce the other sizes if you follow the same principals of layout.

I highly recommend forming the profile of the sole before doing any of the other layout and cutting. It makes sure that the mouth is located at exactly the right spot. If you do it at the end then you may remove too much material getting the profile shape just right and then have a very wide mouth.
By the way I always cut the profile on a complex profile plane first whether it is a moulding plane or bench plane such as the raised panel bench plane. This is the opposite advice I recently saw in the article for the raised panel plane from Popular Woodworking. Try it both ways and you will see it results in a much better plane cutting the profile first.
CLICK HERE TO GO TO THE DOWNLOAD PAGE. (Click on the download button in the upper right corner of the new page to begin download.) These are offered as a free download intended for non commercial / personal use only. These are copyright protected.
If I made any errors anywhere in the plans please let me know so I can update them.
Enjoy!
This is a complex profile moulding plane featuring a 7/8" ogee profile just like I showed off in a prior post. It is a side escapement plane and is a very functional size. A 5/8" size is quite useful as well for general work. This should give you an idea of how to produce the other sizes if you follow the same principals of layout.

I highly recommend forming the profile of the sole before doing any of the other layout and cutting. It makes sure that the mouth is located at exactly the right spot. If you do it at the end then you may remove too much material getting the profile shape just right and then have a very wide mouth.
By the way I always cut the profile on a complex profile plane first whether it is a moulding plane or bench plane such as the raised panel bench plane. This is the opposite advice I recently saw in the article for the raised panel plane from Popular Woodworking. Try it both ways and you will see it results in a much better plane cutting the profile first.
CLICK HERE TO GO TO THE DOWNLOAD PAGE. (Click on the download button in the upper right corner of the new page to begin download.) These are offered as a free download intended for non commercial / personal use only. These are copyright protected.
If I made any errors anywhere in the plans please let me know so I can update them.
Enjoy!
Sunday, November 17, 2013
How to Make the Mouth, Abutment & Wedge For A Wooden Bench Plane
The hardest part of a wooden bench plane to wrap your head around is with out a doubt also the soul and heart of the very plane itself. It is where all the good stuff happens. It is the parts you can't see but that matters the most.

No online picture of an antique bench plane would ever give you the details that you need to make the critical functioning parts. You would be too timid to probably dissemble one if you were to even happen upon the exact one you wanted to duplicate while at flee market or vintage tool shop.
Well no need to now. Even though this post won't go into step by step how to form all the critical parts at least you will see what they are supposed to look like which is half the battle, or more.
While in the process of making a demo plane for a post to show the inter workings (and I had actually already cut it in half in order to show off the inter workings) Doug Moulder came along and drew up my jack plane plans in a 3D model. Great work Doug! So there is a nice plane cut in two parts if anyone wants one. I may or may not get around to photo graphing it to show how the inter workings come together. Funny thing is that after all that I realized that I could have just cut the parts into the side of a block of wood without doing it the hard way and then cutting it in half. Sometimes I wonder...
Anyhow here is the good stuff you have been waiting for. Enjoy!


Also I have a real interesting project in the works. Tapered plane blades. More on that to come!

Well no need to now. Even though this post won't go into step by step how to form all the critical parts at least you will see what they are supposed to look like which is half the battle, or more.
While in the process of making a demo plane for a post to show the inter workings (and I had actually already cut it in half in order to show off the inter workings) Doug Moulder came along and drew up my jack plane plans in a 3D model. Great work Doug! So there is a nice plane cut in two parts if anyone wants one. I may or may not get around to photo graphing it to show how the inter workings come together. Funny thing is that after all that I realized that I could have just cut the parts into the side of a block of wood without doing it the hard way and then cutting it in half. Sometimes I wonder...
Anyhow here is the good stuff you have been waiting for. Enjoy!


Also I have a real interesting project in the works. Tapered plane blades. More on that to come!
Friday, November 15, 2013
Dark Side Of The Moon
I have been deep into completing some plans that have been in the works for about 8 months now. I have been dragging these out and am finally on the home stretch.
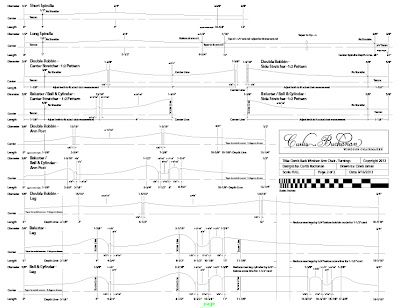
I know that many people have been asking Curtis Buchanan if he is going to put out the plans for his continuous arm chair and the answer is yes as soon as Caleb finishes them! So you can blame me on your having to wait so long. The fact that I have been slow to blog as of late is that I am trying desperately to get these finished in time for Curtis' You tube videos on making this chair are posted up.
We are making these extra special this time with a front and side view and we will see if we decide to fit the top view in as well. The plans will be large and detailed with all the turning patterns and bending forms just like before, only better. These plans will really inspire you to make this chair and give you all the details that are so critical for this type of chair.
Here is a sneak peek.

I know that many people have been asking Curtis Buchanan if he is going to put out the plans for his continuous arm chair and the answer is yes as soon as Caleb finishes them! So you can blame me on your having to wait so long. The fact that I have been slow to blog as of late is that I am trying desperately to get these finished in time for Curtis' You tube videos on making this chair are posted up.
We are making these extra special this time with a front and side view and we will see if we decide to fit the top view in as well. The plans will be large and detailed with all the turning patterns and bending forms just like before, only better. These plans will really inspire you to make this chair and give you all the details that are so critical for this type of chair.
Here is a sneak peek.

Thursday, October 31, 2013
Free Wooden Jack Plane Plans - 18th Century Style
So in my continuing effort to confound people as to how I make my living giving everything I know away in my spare time here is more plans to print and hopefully make something with. (Download link is at bottom of page)
I think this plane is just about my favorite. It is fun to just hog away at rough stock with this guy. Give it a heavy cambered blade and just see the shavings fly. If I could get someone to hold the camera for me I would demo this one in action but I am sure you can imagine.
The great thing about a wooden jack plane is that the sole doesn't have to be ultra flat to work really well. And this is probably the best wooden plane to start with because it is much easier to do a lot of physical rough work with this lighter plane than with a metal one. Once you use it you will understand what I mean.
Also cutting the mouth for a jack is easier since you would typically want it quite open. Cutting the mouth on a smoothing plane on the other hand requires a very tight opening and thus much more precision both for creating the mouth and floating the blade bed to keep the mouth narrow.
I hope to follow up with a cut away view of the inner workings of the mouth. Either a good drawing or an actual one made in wood with several pictures. Don't hold me to the fire on this one as for timing. I will get there eventually. :)
Take care all!
CLICK HERE TO GO TO THE DOWNLOAD PAGE. (Click on the download button in the upper right corner of the new page to begin download.) These are offered as a free download intended for non commercial / personal use only. These are copyright protected.
NOTE: The plans are in PDF format. If you don't have a PDF reader Adobe Acrobat is a free software that will make it viewable and printable.
If I made any errors anywhere in the plans please let me know so I can update them.
 |
| Wooden Jack Plane Plans Image |
The great thing about a wooden jack plane is that the sole doesn't have to be ultra flat to work really well. And this is probably the best wooden plane to start with because it is much easier to do a lot of physical rough work with this lighter plane than with a metal one. Once you use it you will understand what I mean.
Also cutting the mouth for a jack is easier since you would typically want it quite open. Cutting the mouth on a smoothing plane on the other hand requires a very tight opening and thus much more precision both for creating the mouth and floating the blade bed to keep the mouth narrow.
I hope to follow up with a cut away view of the inner workings of the mouth. Either a good drawing or an actual one made in wood with several pictures. Don't hold me to the fire on this one as for timing. I will get there eventually. :)
Take care all!
CLICK HERE TO GO TO THE DOWNLOAD PAGE. (Click on the download button in the upper right corner of the new page to begin download.) These are offered as a free download intended for non commercial / personal use only. These are copyright protected.
NOTE: The plans are in PDF format. If you don't have a PDF reader Adobe Acrobat is a free software that will make it viewable and printable.
You do not have to print these to scale but if you do the first page is sized for 11" x 17" paper. The second one is 8-1/2" x 11". Keep this in mind if you go to the print store. Check the print by measuring the 1" square scale. Do this at the print shop because they often mess up.
If I made any errors anywhere in the plans please let me know so I can update them.
Wednesday, September 4, 2013
Make A Pair Of Wooden Side Round Planes
That title is intended to be an imperative. What? Never mind, just make a pair and you will begin to see your moulding designs really open up and take new shape, literally.
I have found myself using these in many other places than what they were, I am sure, originally intended for. I won't spoil it for you. Do some exploring. For my own personal use I would choose a pair of these over a pair of snipe's bill planes, if I had to make a choice.
I have had a few inquires about these planes and rather than answer the same questions over again I decided I should get my tail in gear and pump out these for everyone.

Along those lines, I have pictured (in the past on this blog) some side rounds that I place the escapement on the opposite side to what is shown in these plans. They both work but as you can see in the plans I do it differently now. It makes everything line up better in the layout and is also a bit more practical for shaving ejection.
CLICK HERE TO GO TO THE DOWNLOAD PAGE. (Click on the download button in the upper right corner of the new page to begin download.)
NOTE: The plans are in PDF format. If you don't have a PDF reader Adobe Acrobat is a free software that will make it viewable and printable.
If I made any errors anywhere in the plans please let me know so I can update them.
I have found myself using these in many other places than what they were, I am sure, originally intended for. I won't spoil it for you. Do some exploring. For my own personal use I would choose a pair of these over a pair of snipe's bill planes, if I had to make a choice.
I have had a few inquires about these planes and rather than answer the same questions over again I decided I should get my tail in gear and pump out these for everyone.

These plans show a single right hand version of a 1/2" radius side round. Just mirror the drawings for the left hand plane. There is a view of the left side and the right side of the same plane so that the escapement and shoulder details are more easily understood as to there location. So don't be confused. I split up some of the toe views so as not to over crowd the details and for clarity. When I have some time I will actually put up some photos of the details, as well.
Along those lines, I have pictured (in the past on this blog) some side rounds that I place the escapement on the opposite side to what is shown in these plans. They both work but as you can see in the plans I do it differently now. It makes everything line up better in the layout and is also a bit more practical for shaving ejection.
If you want to post these anywhere else online please link back to this page/ post. I offer these as a free download but they are not intended for commercial use. Again please limit the use of this design to your personal use and please don't be silly and try to sell them on Ebay. It is FREE! and it is © copy right protected.
CLICK HERE TO GO TO THE DOWNLOAD PAGE. (Click on the download button in the upper right corner of the new page to begin download.)
NOTE: The plans are in PDF format. If you don't have a PDF reader Adobe Acrobat is a free software that will make it viewable and printable.
You do not have to print these to scale but if you do the plans are sized for 17" x 22" paper. Keep this in mind if you go to the print store. Check the print by measuring the 1" square scale. Do this at the print shop because they often mess up.
If I made any errors anywhere in the plans please let me know so I can update them.
Wednesday, July 31, 2013
The Coffin Shaped Smoother- Up Close
Have you tried making that smoother from the plans that I posted up recently? Need a little help or a closer look? Well, here it is.
I put together two videos to show its details and how it performs in that order below.
I really love this little smoothing plane. I hope you make one. It will become a go to plane as it has for me.
I will eventually offer these for sale as well if you don't have the time or the desire to make one yourself. I understand that making a tool is not everyones interest but the using of it is. Let me know if you want more information.
Enjoy!
Saturday, April 27, 2013
Free Wooden Smoothing Plane Plans
So here we go again. It looks like you folks are having fun making some wooden planes so lets add to the fun. Here is a great little coffin shaped smoother for your collection. This is a fantastic size and a great introduction to making a wooden bench plane. The construction of the parts is a very typical arrangement and the size of wood needed to make this is much easier to find.
Here are the plans in several different layouts. The download has four pages. First one is for shop reference with measurements and lays out everything logically but not intended to be to scale. The second is for printing to scale all on one page but is on a large standard size paper of 11" x 17". The last two pages are for printing to scale on your home printer paper of 8-1/2" x 11".

As with other free plans I offer, I have one request and that is if you want to post these anywhere else online please link back to this page/ post. I offer these as a free download but they are not intended for commercial use. Again please limit the use of this design to your personal use and please don't be silly and try to sell them on Ebay. It is FREE! and it is © copy right protected.
CLICK HERE TO GO TO THE DOWNLOAD PAGE. (Click on the download button in the upper right corner of the new page to begin download.)
NOTE: The plans are in PDF format. If you don't have a PDF reader Adobe Acrobat is a free software that will make it viewable and printable. Make sure where ever you print it that the "scale" is set to 100% or the measurements won't be accurate on the print. You may need to unselect "fit to page" when printing.
If I made any errors anywhere in the plans please let me know so I can update them.
UPDATE: See videos of this plane for an unclose look here.
Here are the plans in several different layouts. The download has four pages. First one is for shop reference with measurements and lays out everything logically but not intended to be to scale. The second is for printing to scale all on one page but is on a large standard size paper of 11" x 17". The last two pages are for printing to scale on your home printer paper of 8-1/2" x 11".

As with other free plans I offer, I have one request and that is if you want to post these anywhere else online please link back to this page/ post. I offer these as a free download but they are not intended for commercial use. Again please limit the use of this design to your personal use and please don't be silly and try to sell them on Ebay. It is FREE! and it is © copy right protected.
CLICK HERE TO GO TO THE DOWNLOAD PAGE. (Click on the download button in the upper right corner of the new page to begin download.)
NOTE: The plans are in PDF format. If you don't have a PDF reader Adobe Acrobat is a free software that will make it viewable and printable. Make sure where ever you print it that the "scale" is set to 100% or the measurements won't be accurate on the print. You may need to unselect "fit to page" when printing.
If I made any errors anywhere in the plans please let me know so I can update them.
UPDATE: See videos of this plane for an unclose look here.
Monday, March 25, 2013
Comb Back Windsor Arm Chair Plans by Curtis Buchanan
So finally they are ready! What are they? These are full scale drawings of Curtis Buchanan's comb back windsor arm chair that he made in his Youtube video series. If you have ever wanted to make one of these now is your chance to have all the details in a truly refined design.

These plans are not simply a "rough" design of the original. I took every effort to show exactly how his chair looks once completed. These are not plans intended to "simplify" the making of a really great chair design for the novice woodworker. (These drawings won't talk down to you) They are for those that want to challenge themselves and make an heirloom piece.
We truly feel that no detail is left out. I worked with Curtis for over a year, on and off, working on these to get them just right so that they as useful and as detailed as possible.

Here is a Youtube video of Curtis talking about the plans, the DVD, and topography map of the seat that Jake did. That map is so awesome and really completes these plans.
There are more to come. Watch for the continuous arm chair version that we hope to have completed in the coming months. For now go to Curtis' website and purchase these. I don't stand to profit from these (disclaimer). However, I simply wanted to work with an awesome craftsman and learn from the best while doing my part to make the sharing of this craft open to others. Your support will make it possible for more plans to come.
Friday, March 22, 2013
Free Wooden Rabbet Plane Plans
So in the spirit of getting everyone in the shop and cutting up some wood I decided to post up a measured drawing of a 3/4" wooden rabbet plane in the 18th century style.
It is all wood with the exception of the blade which is easily gotten from Lie-Nielsen here. It features a conical escapement and some simple embellishments that a hand plane, chisel, and #7 sweep gouge can handle.
The plans are basic with a few things that can be easily changed if you like. Such as the bed angle is shown at 55˚, for hardwoods, but could be 45˚or 50˚or even 60˚. I show boxing on the plane but it is of course not a must especially if you are using a hard wood like beech in the first place but it will increase the life of the sole for a heavy user if you decide to add it. And of course you can increase or decrease the width.
I only have one request and that is if you want to post these anywhere else online please link back to this page/ post. I offer these as a free download but they are not intended for commercial use. Again please limit the use of this design to your personal use and please don't be silly and try to sell them on Ebay. It is FREE! and it is © copy right protected.

CLICK HERE TO GO TO THE DOWNLOAD PAGE. (Click on the download button in the upper right corner of the new page to begin download.)
Have fun ya'll!
NOTE: The plans are in PDF format. If you don't have a PDF reader Adobe Acrobat is a free software that will make it viewable and printable. The plans are 11"x17" and any print shop can print this or just print it in two pages on your home computer. Make sure where ever you print it that the "scale" is set to 100% or the measurements won't be accurate on the print.
If I made any errors anywhere in the plans please let me know so I can update them.
It is all wood with the exception of the blade which is easily gotten from Lie-Nielsen here. It features a conical escapement and some simple embellishments that a hand plane, chisel, and #7 sweep gouge can handle.
The plans are basic with a few things that can be easily changed if you like. Such as the bed angle is shown at 55˚, for hardwoods, but could be 45˚or 50˚or even 60˚. I show boxing on the plane but it is of course not a must especially if you are using a hard wood like beech in the first place but it will increase the life of the sole for a heavy user if you decide to add it. And of course you can increase or decrease the width.
I only have one request and that is if you want to post these anywhere else online please link back to this page/ post. I offer these as a free download but they are not intended for commercial use. Again please limit the use of this design to your personal use and please don't be silly and try to sell them on Ebay. It is FREE! and it is © copy right protected.
Have fun ya'll!
NOTE: The plans are in PDF format. If you don't have a PDF reader Adobe Acrobat is a free software that will make it viewable and printable. The plans are 11"x17" and any print shop can print this or just print it in two pages on your home computer. Make sure where ever you print it that the "scale" is set to 100% or the measurements won't be accurate on the print.
If I made any errors anywhere in the plans please let me know so I can update them.
UPDATE: 3/25/13
Hey all, I for some reason I noted 1” where it should have been 3” on the drawing for the mouth location along the sole of the plane. The drawing is still correct but the stated length was a typo. I corrected it. The updated version has a title ending in 3/25/13.
That is what I get for editing my own work. Sorry. Download again if you are in doubt otherwise the error should be very obvious and the physical measurement otherwise is correct either way.
Subscribe to:
Posts (Atom)